Monday, September 30, 2013

Bring On The Cake Masculine Card


 Masculine cards are always a challenge for me so when a hostess asked for simple masculine cards I went to two of my favorite places - my Color Coach and the cleanandsimplestamping website where I can always find a sketch that I'd like to try. 
For my card, I used this sketch


I also added a bit based on a Make & Take we did at Convention where we got and used the Gorgeous Grunge set.  Using this set is really liberating for a perfectionist type like myself! Nothing has to be perfect and it always looks great!  :)
The color combination I found that would work well for a masculine cards was:  Crumb Cake, Cajun Craze & Garden Green.  Crumb Cake's dynamic duo is Chocolate Chip.  
I have to say that I made a boo boo on this card, though, and I didn't realize it until I was putting my supplies away.  Although I stamped the 'Wish Big' sentiment in Chocolate Chip, the strip on the left side of the card is actually Early Espresso.  I knew something was wrong the second I put the card together because something just did NOT look right and I couldn't figure it out.  Until I put my supplies away.  Oh well!
~Enjoy!

Cardstock: Very Vanilla, Chocolate Chip
Ink: Crumb Cake (stamp off), Cajun Craze (stamp off), Garden Green (stamp off), Chocolate Chip
Stamps: Gorgeous Grunge, Bring on the Cake
 

Friday, September 27, 2013

Multi-Embossed Card


This is one of my new favorite cards.  It's actually a combination of this card and this card with my own twist.  This card worked out great for my card classes since we make 3 of each design.  I had a larger piece of each color that we embossed and THEN cut it into thirds which made one strip for each card.  The cards came together quickly after that.   
I can't wait to try other color combinations and different embossing folders!  


Cardstock: Whisper White, Soft Suede, Crumb Cake, Baja Breeze
Ink: Soft Suede
Stamps: Express Yourself (Hostess Set)
Accessories:  Big Shot, Modern Mosaic Embossing Folder, Perfect Polka Dots Embossing Folder, Beautifully Baroque Embossing Folder, Silver Mini Brads
Punches:  Boho Blossoms, Itty Bitty Shapes (flower)


Thursday, September 26, 2013

Elegant Buttefly Punch Card


So, what do you think about the colors used here? I was inspired by the design of these cards and really wanted to use some of my Strawberry Slush In-Color DSP.  I just wasn't sure what to pair it with so, again, I pulled out my Color Coach to see what it suggested.  The result: Strawberry Slush, Rich Razzleberry, and Sahara Sand.  At first, I wasn't sure about the colors, but as this card set on my counter for a few days, it really grew on me.  It was an easy card to make and I'm really happy how it came out!
What do you think?   

Tip:  I used a 2-1/2" X 5-1/2" piece of Whisper White cardstock.  It seemed to be the right size to be able to center the butterflies with equal room on top and bottom.  I punched the middle butterfly first with the cardstock pushed all the way against the punch.  Then, while holding the punch upside down, I looked for the already punched butterfly and moved just a tad to either side (still pushing the cardstock all the way against the punch - this keeps the butterflies lined up going across).  
Hope that makes at least a little bit of sense!  Try it and let me know if you  have questions!


 ~Enjoy!

Cardstock: Sahara Sand, Rich Razzleberry, Whisper White, In Color DSP (Strawberry Slush)
Ink: Strawberry Slush
Stamps: Express Yourself (Hostess Set)
Accessories:  Elegant Butterfly Punch, Modern Label Punch, Pearl Basic Jewels

Tuesday, September 24, 2013

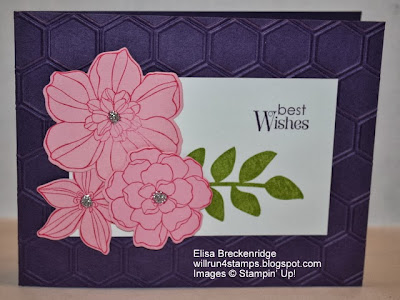
Secret Garden Card in a Flash


I LOVE, LOVE, LOVE this idea of 'Flash Cards' that was created by Connie Stewart.  In fact, her version of this card is what convinced me that I needed the Secret Garden stamp set and matching Framelits. 
This concept not only makes beautiful cards, but the prep is cut down so much.  I LOVE it! 


I did change a few things on my card.  I used my Color Coach to find the colors I used - Melon Mambo, Old Olive & Elegant Eggplant.  I also used the Dynamic Duo Color of Melon Mambo (Pretty in Pink).  I decided to use Dazzling Details to make the middle of the flowers 'pop'.  This card looks so pretty in real life! 
~Enjoy!

Cardstock: Elegant Eggplant, Pretty in Pink, Whisper White
Ink: Elegant Eggplant, Old Olive, Melon Mambo
Stamps: Secret Garden, Petite Pairs
Accessories:  Big Shot, Honeycomb Embossing Folder, Secret Garden Framelits, Silver Sparkle Dazzling Details

Monday, September 16, 2013

Convention 2013 - Polka Dot Dress


Check out this ADORABLE gift that I got at Convention!  It holds a lip gloss!  How cute!  I can't wait to make some of these for my daughter and her friends.  I'm SO glad I got the Dress Up Framelits!  
I believe the tutorial for this came from here.   (This lady has the BEST tutorials!)

Enjoy!

Thursday, September 12, 2013

Convention 2013 - Roommate Gift


These are the gifts my roommate had waiting for her when she arrived at our room this year for Convention!  I love that they coordinate with each other.  They were fun and super easy to make!
For close-ups and more info, click here and here.  

Don't forget to get your Magnetic Platform starting today!  
While you're shopping, be sure to check out the Clearance Rack - updated today!  

Enjoy!

Wednesday, September 11, 2013

Convention 2013 - Roommate Gift part 2


Aren't these little dresses darling?  I hesitated buying these dress framelits for so long but the second I saw them used like this, I HAD to get them.  I LOVE 3-D type projects and these were just too easy to make.  I added a little box, some chocolate and BAM!, a great gift was made.  I added this to the notepad I made for a cute roommate gift.  I made extra to hand out to other friends that I ran into at Convention. 


Have a great day!


Tuesday, September 10, 2013

Finally! The Big Shot Magnetic Platform is available September 12!


It's finally going to be available again!  After going through 13 weeks worth of inventory in only 3 weeks, Stampin' Up! had to turn off the ordering for the magnetic platform to deal with the overwhelming response of this awesome tool!  But on September 12, they are turning the number back on!  Yay!  

Be sure to order yours HERE
Item # 130658
(It's SOOOO worth it!)  :)

Monday, September 9, 2013

Convention 2013 - Roommate Gift part 1


I can't believe it's already been almost 2 months since the Stampin' Up! Convention!  I realized that I haven't shared anything from Convention so I thought I'd share a few things this week.  I am so lucky to have the awesome-est roommate ever at Convention (Hi Carmen!) and I always try to make a gift for her (and any downline I have that attend Convention).  This notepad holder is part of the gift that I made.  (I just realized that I didn't take a picture of the inside.  Doh!)  This was inspired by a tutorial that I found here.  I simplified Brandy's design by not adding the card pocket on the inside and then added my own touch to the outside.  I LOVE the way it came out! :)


Here's what almost 6,000 women (from ALL over the world) look like from above while waiting to get into the Opening Session on the 1st day of Convention.  WOW!


This year was the 25th Anniversary for Stampin' Up! and the theme for this year's Convention was 'Be The Difference'.  I'm so glad for the difference that Stampin' Up! has made in my life.  I've been able to have a creative outlet while meeting some of the BEST people.  I love this company!


Stampin' Up! even had the hallways of the Convention Center decorated with the theme!

Have a wonderful Day!


Tuesday, September 3, 2013

New! Envelope Punch Board!!


I got to try this awesome tool at Convention this year and it was SO EASY to use!  You've just got to try it!  All the math is done for you and printed right on the board so you don't have to guess at anything for so many sizes of envelopes! 

Use this creativity-boosting tool to create anything from itty bitty to long and skinny envelopes! 
  • It creates totally customizable envelopes in up to 66 different sizes (not to mention a million different color and pattern options depending on the paper you want to use).
  • It's super easy to use
  • It's small and lightweight
  • It even has a slick scoring tool as well as a punch that lets you create rounded corners on your envelopes.
  • It's easy to keep it all together; the stylus storage compartment and two punches are designed into the tool so you don't have a bunch of little pieces to keep track of (even the instructions are printed right on the tool so you won't lose them!).
  • The price is terrific-especially for a tool that does so much!
  • It will be in next year's annual catalog, so it's here to stay.
 
Item Description Price
133774 Envelope Punch Board $19.95

Available NOW!  Get yours here!


LinkWithin

Related Posts with Thumbnails